- Getting Started
- Fitting Instructions
- Installation
Getting Started
Materials Required

Hodgson Sealants Heritage Glazing Putty

Glazing Setting Blocks

Sheradised Pins/Non-Rusting Metal Sprigs
Industry Standards Compliance
- BS 8000 Reference 3.4.1.4
- GGF Manual Section 4.2
- BS6262 – Glazing for Buildings (Putty Only)
- Suitable for a 2300 Pa ‘High’ Exposure Rating
Recommended Tools

Hand Held Moisture Meter

High Powered Skeleton Gun

Glazing Shovel

Tooling Block

Glass Cleaner
Fitting Instructions
When to use our glass
These Glazing Systems are recommended for use where a sole glazing material is required to provide a back bedding material, perimeter fill and putty front, or for bead glazing, without the need for multiple products. These Glazing Systems are suitable for the restoration of period properties, listed buildings and glazing in conservation areas in all frame types. Heritage Putty is elastic when cured giving a higher movement accommodation than traditional putties, this is beneficial when used in applications with a reduced sightline and / or narrow rebates in order to accommodate movement. Heritage Putty can also be painted within a short time frame relative to traditional putty types. Linseed oil putty must never be used as it damages the seals of the glazing units.
Heritage Putty Glazing Method
This diagram illustrates internal fronting only

Beaded Glazing Method
This diagram external beads only

Note: Heritage Putty may also be required to comply with BS8000: Part 7 Clause 2.2.1(e) sealing of frame section junctions and fabrication holes, prior to glazing.
Pre Installation
Coating System Suitability
Hodgson Heritage Putty is paintable with water and solvent based products. It is recommended that due to the availability of many different paint types that compatibility tests are conducted prior to painting. Heritage putty can extend the drying time of solvent based paints therefore the use of a water based undercoat can be considered in order to avoid this. Skin formation and curing times of Heritage Putty will vary depending upon temperature and humidity, lower temperatures and low humidity will extend rates of cure. Heritage Putty can be painted once a suitable skin has formed, however, for best results it is recommended that paint is applied a few days after glazing. The paint should overlap the putty onto the glass by 2mm and be kept in good repair.
Distance pieces
Many instances of premature unit failure can be traced directly back to incorrect size selection or absence of distance pieces. Ideally they must have a minimum thickness of 3mm*.
*This may be reduced to 1.5mm when glazing into frames with reduced rebate upstands / sightlines.
Measuring the frame opening
In order to allow the unit to be fully bedded in glazing material, each frame opening must be measured, the unit size calculated and the minimum required edge clearance (3mm*) taken into account as described below.
Glazing and calculating the size of reducing sightline IG units
At the time this document was written a Narrow Cavity Insulating Glass Unit or Reduced Sightline Unit as defined by the GGF is an IGU with cavity widths of 8mm or less and with reduced spacer- bar sightlines. Typically these reduced sightline IGUs are required to have spacer-bar sightlines that are less than the usual minimum sightline depth (determined by the depth of the spacer-bar and the minimum sealant depth stated by the sealant manufacturer).
Due to dimensional constraints, especially when re-glazing existing frames previously designed to receive single glass; it should be noted that when glazing narrow cavity or reduced sightline IGUs, it may not be possible to meet all of the requirements of BS6262, BS8000 or GGF data sheet 4.2. In all instances it is recommended that the glazing method employed should be based on the IGU manufacturer’s own recommendations. Consideration will also need to be made when calculating the required size of the reduced sightline IGU.
Installation
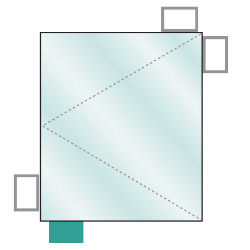
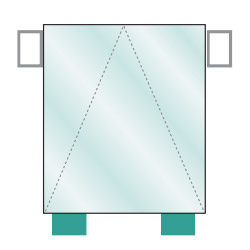
Setting Blocks
Location Block
Setting Block

Fixed Light or Direct Glazed

Side Hung

Top Hung
Preparation of the IG unit
Before the installation, inspect the double glazed unit for obvious defects and wipe any dust or loose material off the unit. Units should be stored in a clean dry area. Do not use chemicals on the edge seal or alcohol based cleaner.
- Check that the moisture content of the window does not exceed 17% as per NHBC Chapter 6.7.
- Remove all beads from the window.
- Remove all dust, grease and loose material from the rebate. Any moisture on the timber should be wiped off using a clean paper towel or other absorbent material to give a dry surface.
- Check the condition of any primer or stain on the frame, especially the rebate. Any section which has been partially missed or is considerably weathered should be reprimed or stained before glazing.
- Check that the unit fits into the frame and can be centralised when standing the unit on the setting blocks. The spacer bar should ideally be level with the sightline or slightly below it.
Glazing of Frames
These steps apply for both the Beaded & Putty glazing methods.
- All IG units must be positioned on setting blocks. If the window has an opening sash, each unit will need to have its weight supported by location blocks in addition to the setting blocks. The position of setting and location blocks depends on the way the sash is hung. Check with the diagram above to select the correct position of location and setting blocks appropriate to the window to be glazed (see Setting Blocks section above).
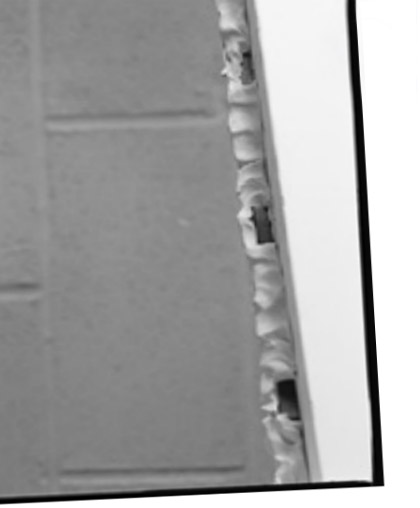
- Apply sufficient Hodgson Heritage Putty to the rebate and insert distance pieces (see Example 1).
- Position the setting blocks on the bottom rebate as near quarter points as possible as shown on Example 2. Where more than one unit per window is to be glazed, start by glazing the bottom unit(s).
- Position the bottom of the unit on the setting block(s). Using a glazing shovel inserted at the side of the unit to control and guide the unit, ease it back a little so that the unit can be centralised in the frame.
- Press firmly all the way round the edge of the unit to engage the distance pieces so as to give a minimum 3mm thickness of compound. This may be reduced to 1.5mm when glazing into frames with reduced rebate upstand / sightline.
- If you are glazing an opening sash, insert location blocks around the sides and top of the units as shown in the Setting Blocks section above.
Example 1

Example 2

Heritage Putty Glazing Approach
First follow the steps outlined in the glazing of frames section (under no circumstances use linseed oil putty as it will damage the seals of the glazing unit).
- Apply further Hodgson Heritage Putty around the edge of the unit to completely fill the perimeter void.
- Secure the IG Unit using non-rusting metal sprigs.
- Apply Hodgson Heritage Putty to fill up the front bedding to the sightline. Knife / tool off the Hodgson Heritage Putty to form a fillet that finishes level or fractionally above the sightline depending upon painting requirements.
- Tool off the back bedding of Hodgson Heritage Putty before it forms a skin (< 20 minutes), finishing with a slope away from the glass.
Frame decoration and maintenance
When painting Hodgson Heritage Putty, information contained within coating system suitability in the pre-installation section of this document should be observed. Regular maintenance of the frame is essential to ensure maximum performance of the glazing system and IG unit.
Beaded glazing approach
First follow the steps outlined in the glazing of frames section.
- Apply further Hodgson Heritage Putty around the edge of the unit to completely fill the perimeter void, finishing with a fillet to bed the bead to the unit and the platform.
- Position the distance pieces opposite those in the back bedding. Bed the bead onto the fillet of Hodgson Heritage Putty and push to engage the distance pieces.
- It is advisable to use shorter pins when pinning beads to the midrails found on some horizontal and all bar windows styles.
- Position the pins at right angles to the surface of the bead. They should be no more than 50mm from either end and not more than 150mm apart. There should always be at least two pins for every bead. Position and pin the two side beads and top bead.
- Apply Hodgson Heritage Putty to fill up the front bedding to the sightline, finishing with a slope away from the glass at a 45 degree angle.
- Tool the internal and external bedding to a Chamfer to assist in the shedding of water.
Hodgson Heritage Putty Usage Calculator
Linear metres of glazing per 290ml cartridge for putty fronting in accordance with glazing system. For a typical sash containing 9 off 300 x 200mm units approximately 2 cartridges would be required. This calculation does not allow for any wastage in the process.
Based on:
- 2mm thick back bedding
- 2mm edge clearance
- 10mm rebate upstand
- 10mm thick slim style IG units


